Chapter 6 of 11 · 20 min
Sizes, colours and barcodes
How one product becomes the twenty-four things you actually sell, each with its own barcode and its own stock figure.
You have a product whose size-by-colour grid is generated correctly, every row has a scannable barcode, labels are printed, and you know which decisions on this screen you cannot take back.
This is the chapter that pays for the software. A generic till sells "a shirt". Your shop sells a shirt in black, in medium — and that is the row that carries a barcode, a price and a stock number in each branch.
Product, variant, and why the grid is generated
The product is the model: name, description, category, brand, season. The variant is the thing on the shelf: one size in one colour. Every variant has its own SKU, its own barcode, its own price and its own stock figure per branch. When a cashier scans a tag, they are scanning a variant.
One model in three colours and eight sizes is twenty-four variants. Nobody types twenty-four SKUs, so you type two short lists and the grid is generated from them. The screen is built so that a model in three colours and eight sizes takes under three minutes.
If an item genuinely has no sizes and no colours — a belt, an accessory, a gift item — leave both lists empty. You get one sellable variant rather than none.
Type the two lists
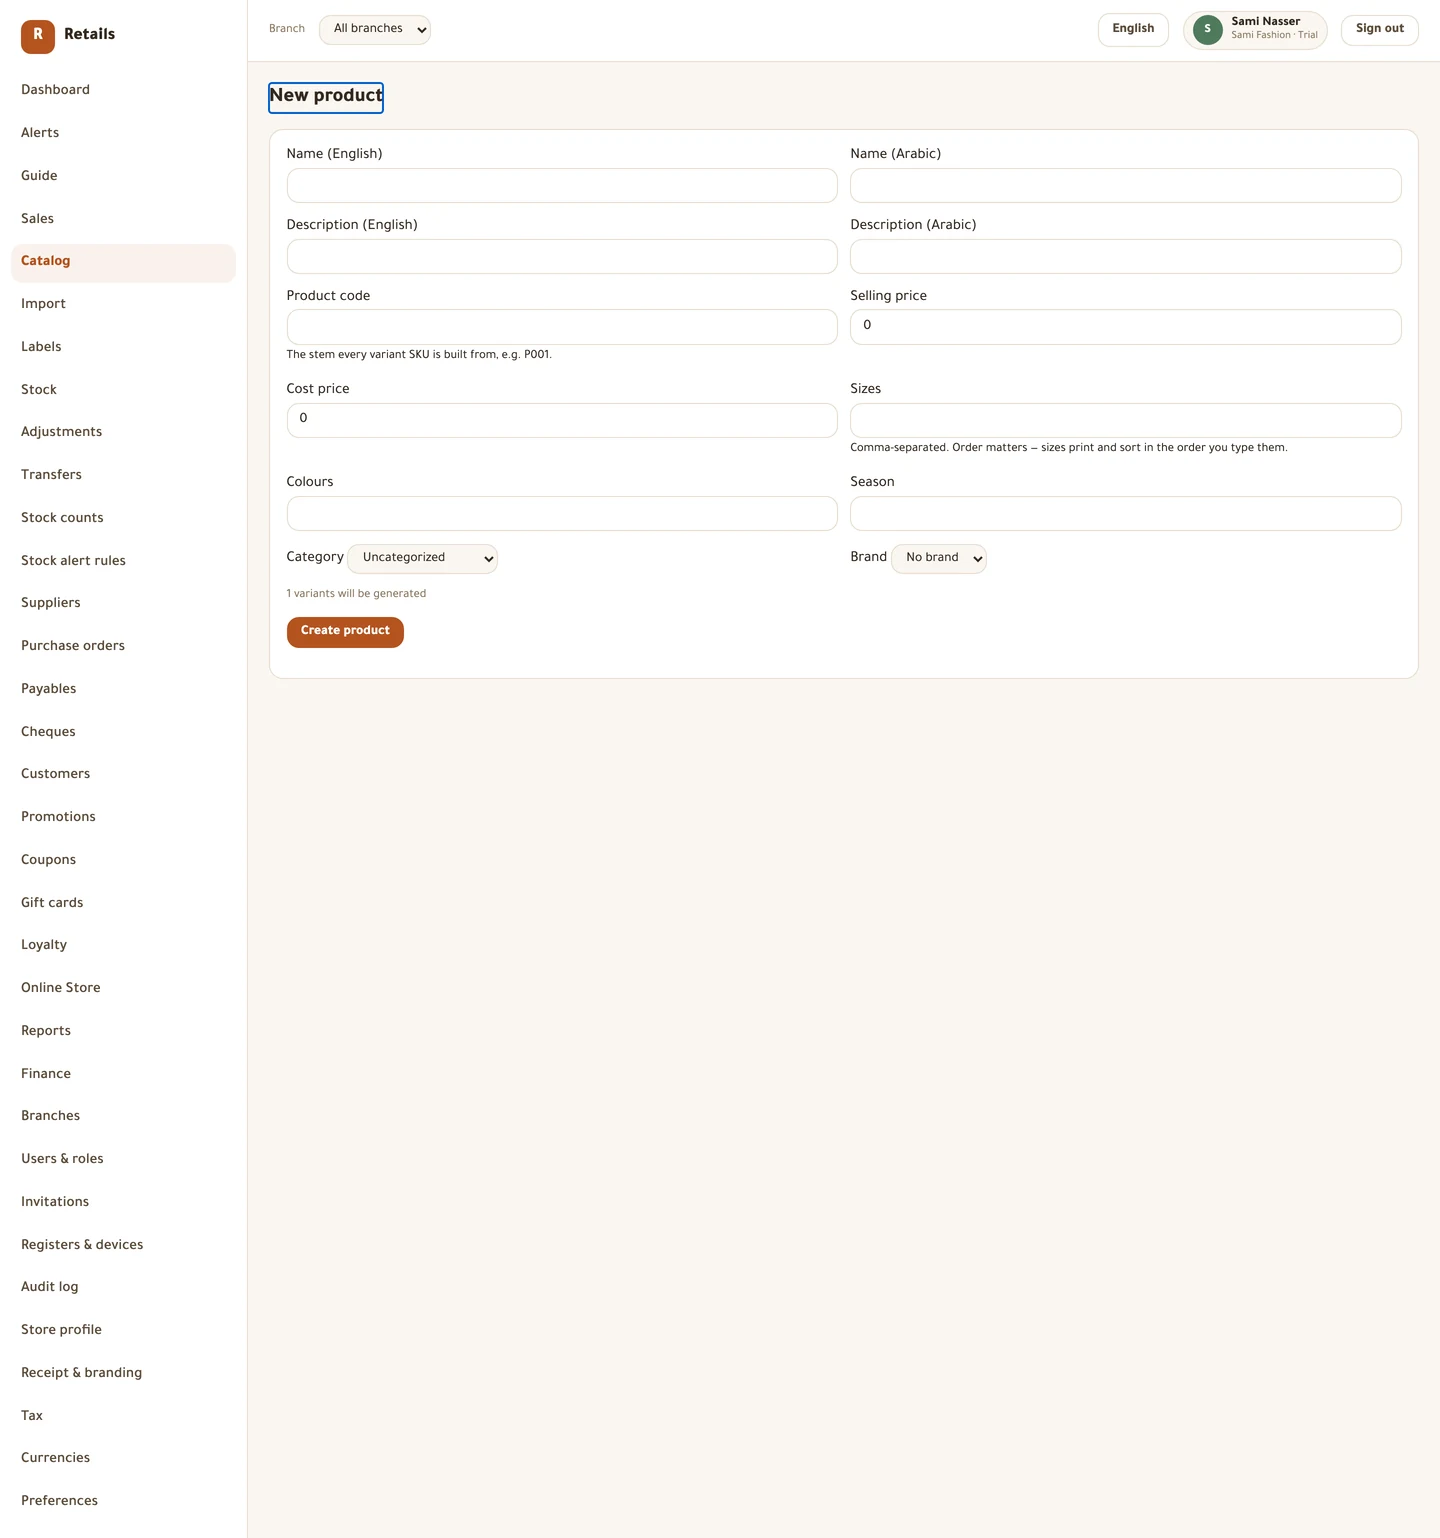
The Sizes and Colours boxes only exist while you are creating the product. Read the rest of this chapter before you press Create product.
Do this
- Open the product editor with New product and fill in the product-level fields from chapter 5.
- In Sizes, type the sizes separated by commas:
S, M, L, XL. Spaces around the commas are fine. - In Colours, do the same:
BLK, WHT, RED. - Keep each code short, and in Latin letters or digits — what you type here is what lands in the SKU.
- Type the sizes in the order you want them, not alphabetically. The screen says so under the box: sizes print and sort in the order you type them.
- Read the line under the form: {n} variants will be generated. Check that number.
- Press Create product.
Read the matrix
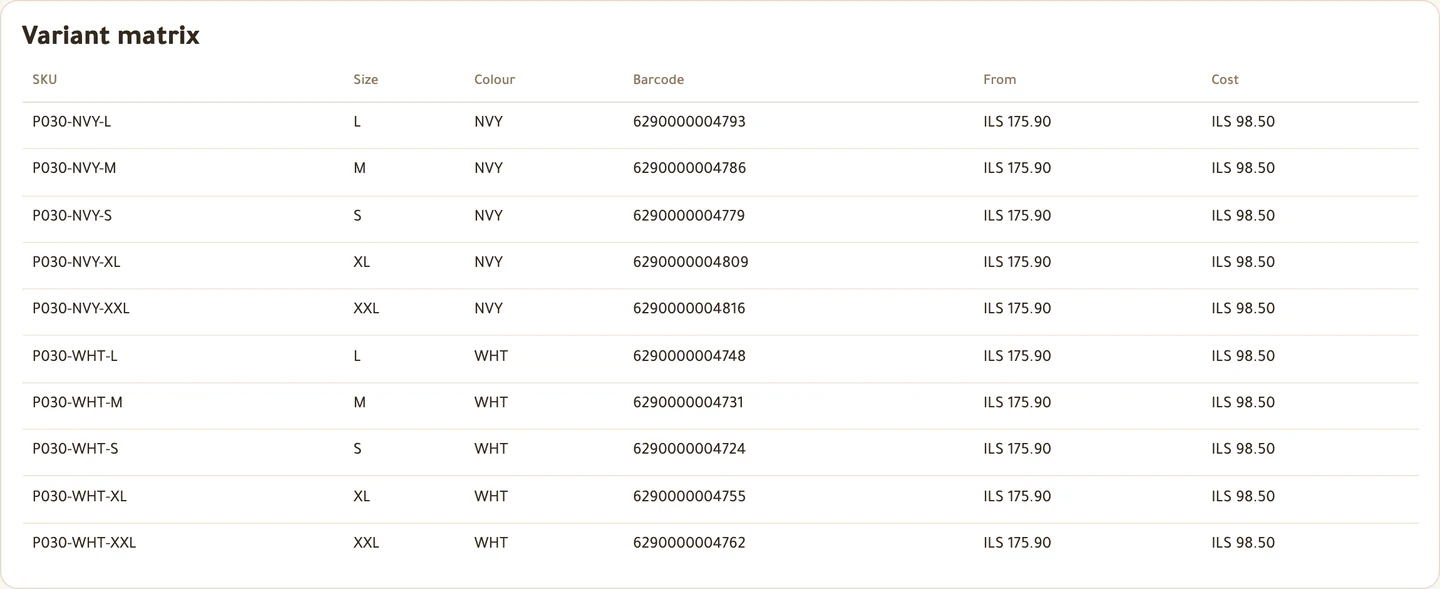
Saving reloads the page as the product editor, with a Variant matrix table underneath the form. One row per size-and-colour combination, with columns for SKU, Size, Colour, Barcode, price and Cost.
The rows come out colour by colour, with the sizes inside each colour. That is the order a shop rails its stock, so the SKUs sort the way somebody counting them expects.
What a SKU looks like
The pattern is {PROD}-{COLOR}-{SIZE}. Product code P001, colour BLK, size M gives P001-BLK-M.
Everything is upper-cased, and anything that is not a letter or a digit is dropped: blk 2 becomes BLK2. A SKU gets scanned and typed, so it must not carry whitespace or punctuation that a barcode font would silently swallow.
If that SKU is already in use somewhere in your catalogue, -2, then -3, is appended until it is free. The product is not refused over a collision you did not choose and cannot see. And if you left an axis empty, its part of the SKU is simply left out — no dangling dashes.
Barcodes
Every variant is given a generated EAN-13. It is built from a prefix and a running counter, and the thirteenth digit — the check digit — is computed, not chosen. A code with the wrong check digit is refused by the scanner at the till, with a customer waiting, and nothing about that failure looks like a bug until a stocktake.
The default prefix is 629, Palestine's GS1 country code. That is the right answer for a shop labelling goods for its own tills.
When the goods already have a barcode on them
There is no scan-to-fill box in the product editor, and no way to type a barcode into a matrix row. Every variant gets the generated one.
To put the supplier's printed barcode on a variant instead, use the import screen: put that variant's SKU in the sku column and the printed barcode in the barcode column, and import. Rows are matched by SKU, so an existing variant is updated rather than duplicated.
Print the labels
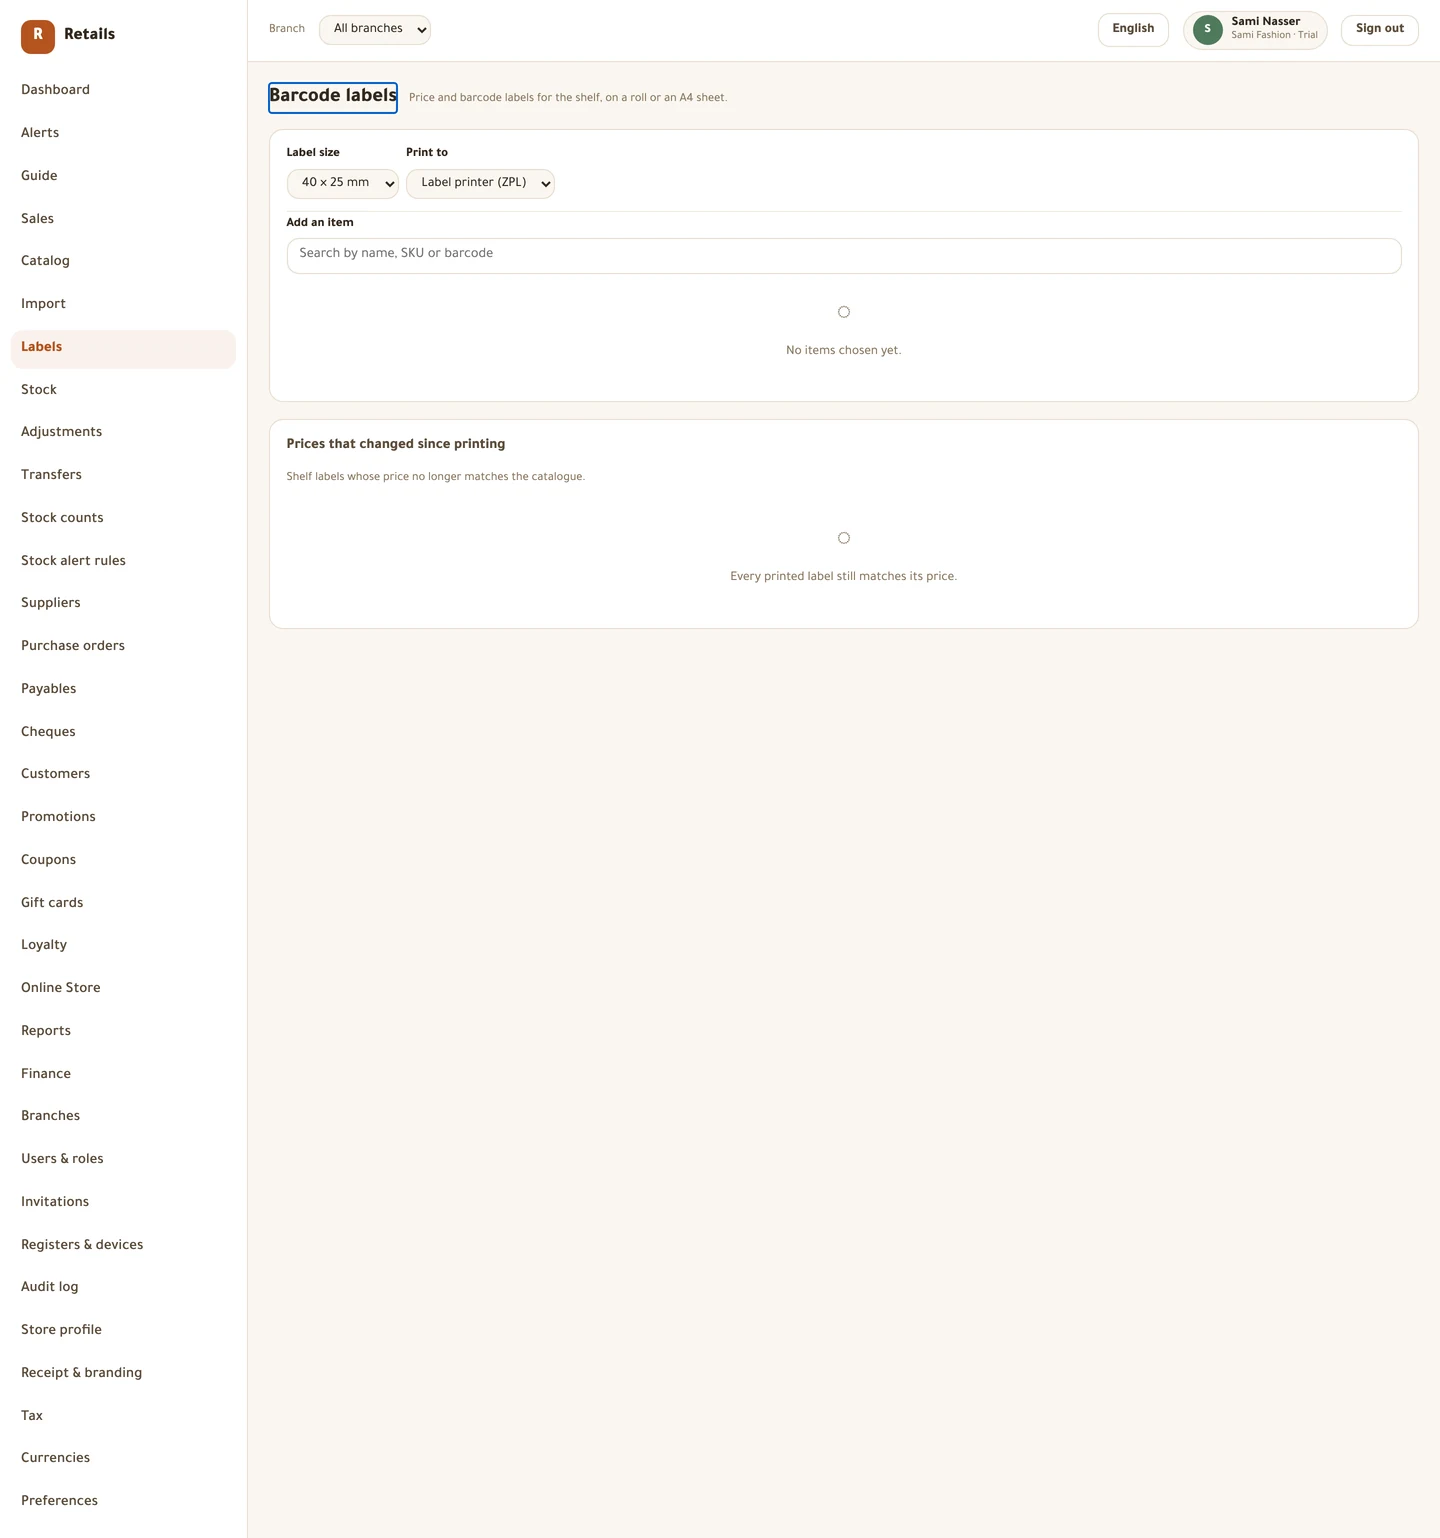
Open Labels from the side menu.
Do this
- Press Add an item and search by name, SKU or barcode. Add each variant you need labels for.
- Set Labels — the number of stickers — against each one.
- Choose the Label size: 40×25, 50×30, 60×40 or 30×20 mm.
- Choose Print to: Label printer (ZPL) or A4 sheet.
- On A4, set Start at position to skip the labels already peeled off a part-used sheet. There are 65 positions on a sheet.
- Press Generate and read What will print.
- Press Download the ZPL or Print the sheet.
Adding a size later
This is the one that catches everybody, so read it before you create your first real product.
Sizes and Colours exist on the create form and nowhere else. Once the product is saved those boxes are gone, and there is no screen in the back office that adds a size or a colour to an existing product. The import will not do it either: a row whose SKU has never been seen becomes a whole new product with one variant, not a new variant on the product you meant.
So decide the full size run and the full colour range before you press Create product. If a supplier later sends an XXL you did not plan for, the only thing you can do today is create it as its own product — and expect that to look untidy in reports, because it is.
Archiving is not deleting
There is no delete anywhere in the catalogue. The only button is Archive, and it sits on the product, not on a variant.
Archiving a product archives every variant under it, and the registers drop it from their catalogue snapshots at their next sync, so it can no longer be scanned at a till. It still appears in last year's reports and it can still be returned — which is exactly why it is archived rather than deleted.
There is no per-variant archive. You cannot retire one colour and keep the other two.
Before you move on
- The size list is in the order you want it printed, not alphabetical
- The generated variant count matched what you expected before you saved
- Every row in the matrix has a SKU and a barcode
- Labels are printed and you have read the Notes column
- The full size run and colour range were decided before the product was created
- You know that archiving a product takes its stock out of sight along with it
Every picture on this page is a photograph of the real screen, taken from a running store.